


Investigative and incident response scalable infrastructure
Traditional computer forensics and cyber investigations are just as applicable in the cloud as they are in physical locations, but access to and execution of these investigations varies.
This article will outline some of the difficulties associated with implementing on-premises forensics techniques in the cloud and demonstrate an Azure-based solution to these problems.
The Scalable Infrastructure for Investigation and Incident ResponseGitHub repo, which includes a readme, contains the PowerShell files mentioned in this blog. md that includes a step-by-step guide to setting up the environment
The following presumptions are made in this post:
- You’re going to make a Windows VM image.
- Your subscription contains all of your permissions.
- Within your subscription, you will have two resource groups: one for deployed virtual machines and the other for templates.
Please take note that the goal of this blog is to assist you in getting ready for cloud forensics. We are directing links to relevant documents that offer background information or more information.
How to adapt and why forensics is different in the cloud
When attempting to integrate their conventional forensic investigative tools and capabilities into a cloud environment, investigators encounter some difficulties.
- working in large quantities. In a cloud environment, it is difficult to use the hardware needed to conduct on-premise and physical investigations ( at least not without the time and bandwidth required for downloading and uploading enormous amounts of data ).
- distance. A timely response is not possible if all of your investigative resources are concentrated in one place. The process of gathering evidence from machines located on the other side of the world will still take time, even if the investigation capability is hosted in the cloud.
- more exposure During an investigation, investigative equipment may become contaminated or infected, particularly if malware analysis is involved. A risk of aggregated data also exists, in which the potential size of an investigation machine could make it a target.
- maintenance. There is maintenance at last. All software updates and refreshes, as well as the operating system, must be patched and updated if there is a fleet of always-on machines.
Making a virtual image for investigations and deploying it as necessary is one way to deal with these problems. It would be more expensive and difficult to manage to create multiple investigative VMs in various regions and leave them running for availability and update management.
An image of a prebuilt VM (up to date and with pre-deployed tools and apps ) should be deployed to each region you need. Then, as needed, you can create multiple machines using each image. Azure PowerShell cmdlets, Azure Automation, and Runbooks are necessary for the solution. The specifics will be covered in the sections that follow.
The investigations image is set up.
Create the Tools VM, create an automation account, build runbooks, prepare scripts and storage, protect credentials, test, and schedule your forensic environment. Let’s look at how to do all of these things.
First, create and prepare a virtual machine.
To use the template, we must first create the initial VM image. We’ll use a resource-managed Windows 10 Virtual Machine to accomplish this. Deploy it to your templates resource group using the standard creation procedure. To restrict remote access to only authorized endpoints, make sure Network Security Group is activated.
We connect to the VM after deployment and set it up in the desired state. The user account and user-based customization are then removed using <a href=”https://docs.microsoft.com/en-us/windows-hardware/manufacture/desktop/sysprep–generalize–a-windows-installation” target=”_blank” rel=”noopener”>Sysprep, which transforms the image into a generalized one. ( Remember that you might encounter errors when attempting to run <a href=”https://docs.microsoft.com/en-us/windows-hardware/manufacture/desktop/sysprep–generalize–a-windows-installation” target=”_blank” rel=”noopener”>Sysprep) if you are updating or removing Windows Store apps. See this support article for more details: When you update or remove Microsoft Store apps that come with built-in Windows images, <a href=”https://docs.microsoft.com/en-us/windows-hardware/manufacture/desktop/sysprep–generalize–a-windows-installation” target=”_blank” rel=”noopener”>Sysprep stops working.
C:WindowsSystem32Sysprepsysprep.exe /generalize /oobe /shutdown /quiet Note: Refer to the documentation provided here to prepare an imaged LinuxVM.
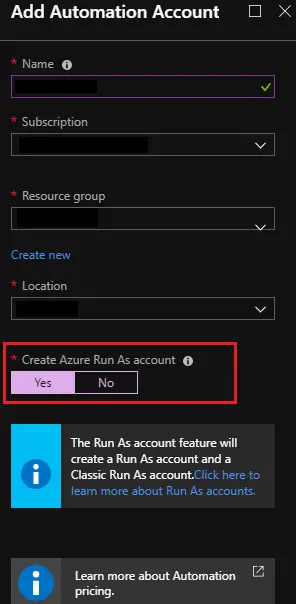
Create an automated account in step two.
We must include an automation account in the Resource Group’s” Templates” in order to enable the automation component of this solution. Make sure the” Create Azure Run As Account” is set to “yes” and add an automation account with a suitable name.
Create an Azure Automation account for more information on creating automation accounts.
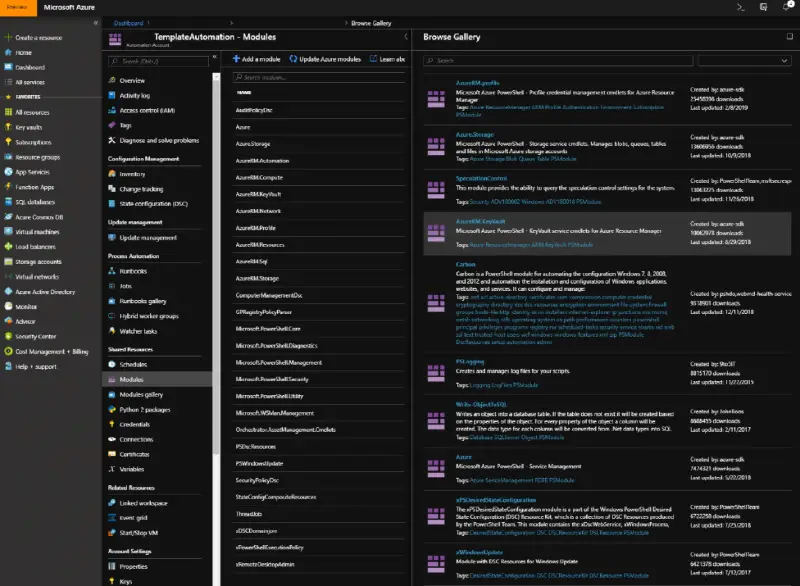
We will first import/enable modules into the automation account that will be running the scripts in order to enable the use of specific cmdlets in the runbooks. Verify the presence of the following modules after selecting the recently created automation account. Use the “add a module” command to add them if they are n’t already there.
- Azure
- Azure.Storage
- AzureRM.Automation
- AzureRM.Compute
- AzureRM.KeyVault
- AzureRM.Network
- AzureRM.Profile
- AzureRM.Resources
- AzureRM.Sql
- AzureRM.Storage
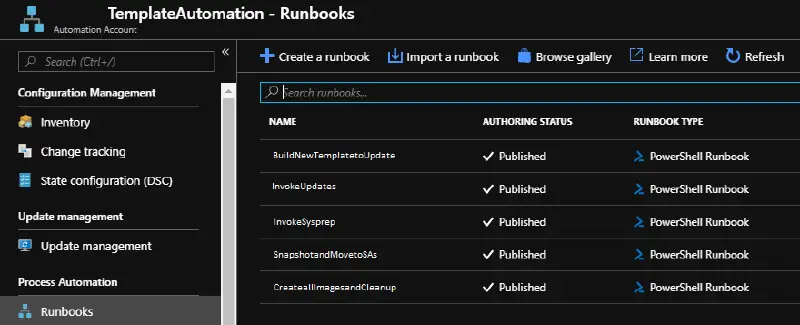
Create runbooks in step three.
The runbooks and PowerShell scripts that the automation account will run must now be created. Visit the Automation Account’s Runbooks section to create a runbook. Choose” Create a new runbook” from the Resource Group, Automation Account, and Runbooks options.
A PowerShell Runbook must be created in order to run these scripts, but there are other runbooks that can be made. In order to automate the actions we want, we must produce a total of five runbooks. All of these scripts can be found in our GitHub repository:
- Create a fresh template for updating. ps1.
- One of our images will be used to deploy a virtual machine (VM ) that is prepared for updating.
- Launch Updates. ps1.
- In order to download and run” 2a,” this script will run a custom script extension on the VM that is being deployed. Windows Update. ps1.”
- Activate Sysprep. ps1.
- In order to download and run” 3a,” this script will run a custom script extension on the VM that is being deployed. sysprep. ps1.”
- Move to SAs after taking a screenshot. ps1.
- The updated and generalized VMs disk will be captured in this script. Every available Azure region will have storage accounts created, and each storage account will receive a copy of the snapshot. ( This can be changed to only include the desired regions. )
- All images should be created and cleaned.
- From the snapshots copied to each region, this script generates virtual images, which are then deleted because they are no longer required.
Before running any of the scripts, you must update them and save the runbooks because they have all been stripped of their variable names. What is required for each variable should be described in the comments next to it.
See Create an Azure Automation runbook for more details on running runbooks and getting access to the tutorials.
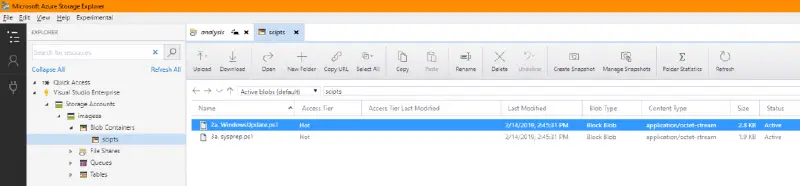
Create storage accounts and scripts in step four.
To run scripts on the VM, we need to have the scripts available and in a location that can be updated independent of the VM. For this we will create a storage account which will be accessed by “2. Launch Updates. ps1.” and “3. Activate Sysprep. ps1.”.
Create a storage account in the Templates resource group, then name the container you create in its “blobs” section. the following two PowerShell files from GitHub using “scripts”:
- 2a. Windows Update. ps1.
- 3a. sysprep. ps1.
- The VM will be shut down after this script runs Sysprep with the flags “generalize” and” OOBE” ( Out of the Box Experience ).
You can update these scripts whenever you want to add new functionality, such as updating, installing, or removing applications, because they are stored in a storage account rather than on the virtual machine.
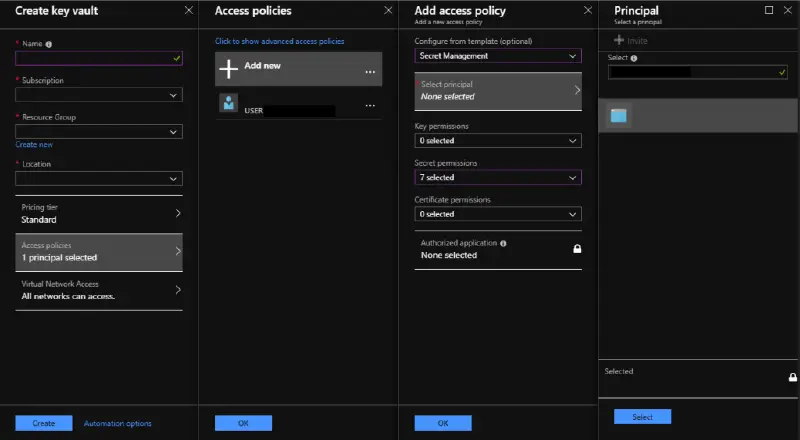
Step 5: Securely store credentials
We will use Azure’s Key Vault feature to manage the credentials and secrets of the virtual machines (VMs) deployed from these images. Both of the Resource Groups we are using,” Templates” and” DeployedVMs,” require us to create a Key Vault. The automation account created in Step 2 must be added to the Access Policies as a principal with Secret Management as its permissions during the creation of both key vaults.
Test the procedure in step six.
A VM should be created and set up at this point, along with five runbooks that contain all of the automation ( with variables filled ), a storage account with the PowerShell scripts you want to run to update the template, and two key vaults where the secrets are kept.
It’s time to test ( and, if necessary, debug) what you’ve accomplished so far before moving on. Execute the runbooks listed below after navigating to the templates resource group:
- Start the” Snapshot and Move to SAs” runbook.
- For details on the execution, look in” all logs.”
- Wait for the copy/move to be finished for two to three hours.
- Start runbook ‘All images should be created and cleaned.’
- For details on the execution, look in” all logs.”
- 10 minutes, please wait for this to finish.
- Select the Iiage you just created in the Azure Portal, then use the wizard to create a virtual machine (VM ) by deploying it from the image.
- Wait for the virtual machine to deploy for 5 to 10 minutes.
- Verify that everything is operating as expected by connecting to the virtual machine.
- Remove the VM and any related ( NSG, vNet, etc. ) resources. that you’ve developed and put to the test
- Start the runbook’s” Build New Template to Update” section.
- For details on the execution, look in” all logs.”
- 5 to 10 minutes should pass while the VM deploys.
- Start the” Invoke Updates” runbook.
- For details on the execution, look in” all logs.”
- Check and review the log file in C: UpdateLogs to see if this was executed on the virtual machine.
- Run the runbook” Invoke sysprep.”
- For details on the execution, look in” all logs.”
- Wait 15 to 20 minutes for Sysprep to finish.
- This will demonstrate that Sysprep functioned properly because your VM should be shut down and there should n’t be any activity in the virtual machine graphs.
- Finally, remove the VM and any associated ( NSG, vNet, etc. ) resources.
Debug the runbook and re-test if you experience errors or failures.
Schedule the procedure in step seven.
You can now configure the schedule to run this process automatically after you’ve deployed a virtual machine image to every region you want. Go to the automation account and schedules to do this. To define the schedule for each task, add additional schedules here. Pick a low-usage day, like Saturday night or Sunday morning, to reduce disruption to end users. We advise you to maintain the same order and wait periods on any given day. As an illustration:
| Name | Start Time/Date | Zone of Time | Recurrence |
|---|---|---|---|
| Deploy_Sat_PM | 05/01/2019 23:00 | UTC | The second Saturday in the month |
| Update_Sun_AM_1 | 06/01/2019 00:00 | UTC | The month’s second Sunday |
| Update_Sun_AM_2 | 01: 00 on 06/01/2019 | UTC | The second Saturday in the month |
| Sysprep_Sun_AM | 02: 00 on 06/01/2019 | UTC | The second Saturday in the month |
| CopyToSAs_Sun_AM | 04 :00 on 06/01/2019 | UTC | The second Saturday in the month |
| ImageAndCleanup_Sun_AM | 06/01/2019 07:00 | UTC | The second Saturday in the month |
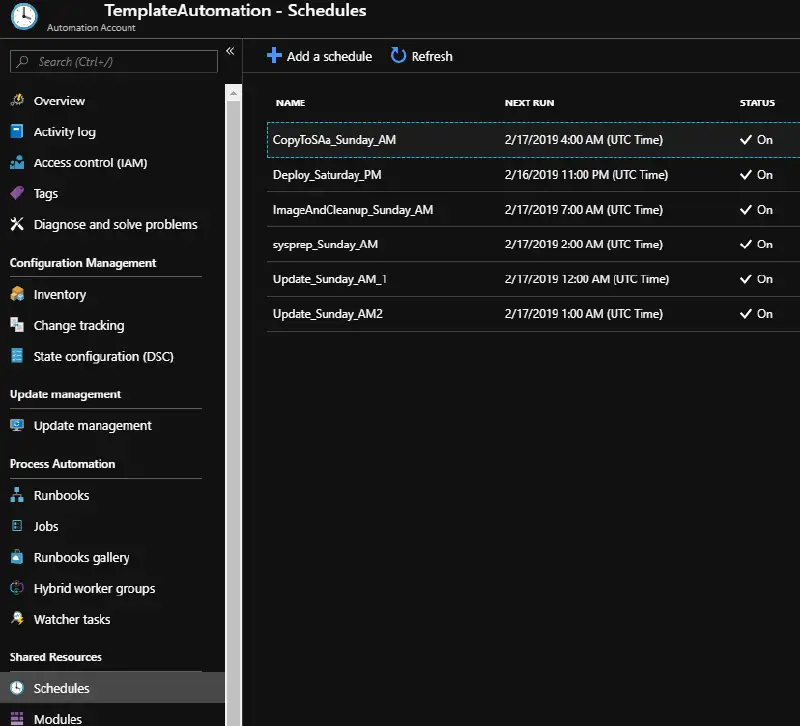
The schedules we just created should have the following runbook attached:
Schedule Name Associated RunbookDeploy_Saturday_PM DeployTemplateVMUpdate_Sunday_AM_1 InvokeUpdateUpdate_Sunday_AM_2 InvokeUpdateSysprep_Sunday_AM InvokeSysprepCopyToSAs_Sunday_AM SnapshotAndCopyImageAndCleanup_Sunday_AM ImageAndCleanup
Investigate now
The automation we just developed will guarantee that all Azure regions ‘ VM images are current and functional.
Run the PowerShell script” CreateVM” to create one of these virtual machines. ps1’ ( before it is distributed, variables must be configured. ) You will be prompted for a specific VM ID as well as the region to which you want to deploy it. Once deployed, you can access the” Deployed VMs” Key Vault using the username and password specified in the script. When your VM is complete, you can use the DeleteVM to remove it ( along with any associated resources ). ps1 and the distinct ID of the VM.
You need to use your newly configured virtual toolbox in some way. We’ll go over how to obtain a virtual machine for an investigation in the following blog post in this series.
Senior Service Engineer at MSRC Scott Miller
Important Reminders from the Most Recent Phishing Attacksobtaining an investigative VHD
Contracts for February 9, 2024IEEE Conference on Synthetic Aperture Computational Imaging ( 2024 )(Opens in a new browser tab)